
Activate your options
Squarespace can only charge for products. So each paid optionAn option that costs money, like “Laser engraving +$15.00”. Each one gets a product in Squarespace, so checkout can charge for it., like “Laser engraving, $15”, gets a product in SquarespaceThe product that charges a paid option, like “Laser engraving, $15”, on your Add-ons page. OptionKit adds it to the cart when a customer picks that option., on a page that isn’t in your menu. When a customer checks engraving and clicks Add To Cart, OptionKit puts that product in the cart too. Squarespace then charges for both, like any two products. What the customer typed shows on the order, next to a short item codeA short code, like “Item: MANGO-42”, that OptionKit gives each personalized item. Its Personalization line lists the paid options it was charged for, under “Charged separately”, so you can see which paid options belong to which item. (like Item: MANGO-42) that matches it to the right item.
Setting up · part 3 of 4
Updated October 2026 · Squarespace 7.1
One more product costs $0: the Personalization productOne product, on your Add-ons page, that costs $0. It carries what the customer typed or chose, so it shows up on the order.. It carries each customer’s details onto the order. OptionKit can create all of these products in Squarespace for you. Or the builder makes one file with all of them, and you import it into Squarespace once. After that, OptionKit adds them to the cart for customers.
This is step 3 of the builder’s Setup guide, Activate your options. Do its three parts in order:
- Create your Add-ons page in Squarespace.
- Create option products: select Connect with Squarespace, or import one file.
- Add a form to Personalization in Squarespace.
Keep the builder open beside Squarespace while you follow this page. A store whose options are all free creates just one product, “Personalization”.
1. Create your Add-ons page
The part says, in grey: “This page will hold the 6 products you’ll create next.” Both ways of creating the products need this page, because Squarespace doesn’t let apps make pages. Then, with Squarespace’s labels in bold and Pages ↗ a link that opens Pages in a new tab:
- In Squarespace, open Pages ↗.
- Select + beside Not LinkedThe part of Squarespace’s Pages list for pages that aren’t in your menu..
- Select Products on the left, then select the Store tab.
- Name the page Add-ons.
- In Pages, hover over Add-ons and select the settings gear.
- Set URL Slug to
add-ons(a small Copy beside it in the step copies it). The page then lives at yourstore.com/add-ons, where OptionKit looks for your paid options. - In the page’s settings, open SEO and turn on Hide page from search results. Its products then stay out of search engines too.
- Save your changes.
- If Squarespace added sample products to your Add-ons page, delete them: in Products, select the three dots ⋯ beside each sample product and choose Delete. OptionKit doesn’t use them, and once they’re deleted, no customer can buy one.
Under the steps, the part says “Keep this page under Not Linked and leave it enabled.”, with the grey line “Pages under Not Linked don’t appear in your site’s navigation.” The page can still be opened by its address, and may show in your site’s search unless step 7 hid it. If the page is disabled or has a password, OptionKit can’t read it, and every paid option shows as Unavailable.
Come back to the builder: the part checks itself, or select Check now. Once the page is found, the part folds to ✓ Add-ons page found. Something to fix? See What the Setup guide says.
2. Create option products
Two ways. The recommended one is in a box headed Create automatically, with Recommended beside it; under it, a folded row, Set up manually ▾, holds the other.
Create automatically · Recommended
The box says, in grey: “OptionKit adds your 6 products to Squarespace for you and keeps their prices up to date.” Then:
- Select Connect with SquarespaceThe button in step 3 of the Setup guide, under Create automatically · Recommended, that lets OptionKit create the products for your paid options in Squarespace and keep their prices up to date. below. A Squarespace window opens.
- Log in to Squarespace if it asks.
- Select your site. Squarespace lists the sites you can reach with the login you’re using there, with each site’s address under its name.
- Select Allow. OptionKit only changes the products for your paid options: the ones it makes, and ones you linked to an option. Before the window opens, the step says in grey: “Squarespace also asks to let OptionKit view your orders and customer information, because each order includes the customer’s name, email and address. OptionKit only checks each new order for missing choices and keeps none of your customers’ details.”
- When the window says ✓ Connected to Squarespace., select Back to the builder. If the window can’t close itself, it says so, and you close it yourself.
Back in the builder, the box says “✓ Connected to Squarespace. OptionKit adds the products for your paid options and keeps their prices up to date.” Under Put them on this store page, your Add-ons page is picked by itself; choose another store page that isn’t in your menu if you like. The list shows each product and where it stands, and the button under it says how many, like Create 6 products. Select it, and each row says ✓ Created, or why it couldn’t be made. Once they’re all there, the part says “✓ Laser engraving is in Squarespace.” for one paid option, or “✓ All 6 are in Squarespace.” for more.
OptionKit makes one visible product for each paid option, and the Personalization product at $0, on the page you chose. Each has unlimited stock, the tag optionkit and a Description you see in Squarespace’s Products: “Personalization” says “Used by OptionKit to keep customers’ choices with their item. Keep it at $0, with its form. Don’t delete it.”, and each paid option’s product says “Used by OptionKit for the paid option “Gift box”. Change its price here.” OptionKit never deletes a product. Allow also lets OptionKit view your orders, so it checks each new order and emails you when part of a personalized item is missing. It keeps none of your customers’ details. A product you no longer use is listed under “No longer used”, for you to remove in Squarespace if you like.
Prices stay in step by themselves. In Settings › Squarespace, Update prices in Squarespace is on to start with: when you change a price in the builder, Update changes it in Squarespace too, and says what first. A paid option’s product put on sale in Squarespace is taken off sale, so customers pay the set price. Version history › Restore this version puts Squarespace’s prices back too.
To disconnect in the builder, select Disconnect in Settings › Squarespace. The builder asks first: “Disconnect OptionKit from Squarespace? It will stop creating products and updating prices. Existing products will stay. Removing the extension in Squarespace may take time to disconnect it here.”, with Stay connected as the safe answer. The products already made stay. Removing JuiceKit in Squarespace’s Settings › Extensions › Connected Extensions may not end it right away, so disconnect in the builder first. After that, the builder’s settings say “Not connected · Connect in Setup, step 3”.
After Disconnect, Squarespace may still list JuiceKit in Settings › Extensions › Connected Extensions. Remove it there too. The builder says so under Not connected, with Open Settings in Squarespace ↗.
Set up manually ▾ · Import the required products
Select the row Set up manually ▾ to open it. Inside is one part, Import the required products. It says, in grey: “This file creates 6 products on your “Add-ons” page: one for each paid option, plus the free “Personalization” product that saves your customers’ choices on their orders.” (With only free options: “This file creates the free “Personalization” product on your “Add-ons” page. It saves your customers’ choices on their orders.”) Then “Select Download import file below.” and, with Products ↗ a link that opens Products in a new tab:
- Open Products ↗ in Squarespace.
- Select Import in the top-right corner.
- Select the grey box labeled Upload Squarespace CSV and choose the file you downloaded.
- Once the filename appears, select Import at the bottom of the window.
- Wait for the import to finish, then return to OptionKit.
Download import file is the part’s one button. The file holds only the paid options that aren’t in your store yet. Each product it makes is on your Add-ons page, with its name and price, stock set to unlimited, visible, tagged optionkit, no weight, and the same Description as above. A “Duplicate product URL” message in Squarespace means that product is in your store already, so importing the file twice is safe. Added a new paid option later? The part says “1 new paid option to import”: download the file again and import it.
Come back to the builder: the part checks itself and says how many are ready, like 4 of 6 ready · ⚠ 2 to fix · View all. Ready means found, with the right price and in stock. When all are ready, the part folds to ✓ All 6 products ready. Something to fix? See What the Setup guide says and View all below.
See each one: View all
View all, at the end of the part’s count, opens Paid options in Squarespace: each paid option with its price and where it stands. At the top it says when your store was last checked, with Check now. While the list is open, it checks again by itself.
| Status | What it means |
|---|---|
| ✓ Ready | It’s in your store with the right price and in stock. |
| Not in your store yet | It isn’t in your store yet. It’s in the import file. |
| ✗ Missing | Some are in your store, but not this one: “Not in your store yet. It’s in the import file.” Named it differently in Squarespace? Select It’s called something else and choose which product it is. |
| ! Price doesn’t match | Which price do you want to use?, with Squarespace $8.00 and OptionKit $9.00. Select Squarespace’s price to use it in OptionKit too (then select Update). Or select OptionKit’s price: Products opens in Squarespace, and the row says what to change there, like Gift box to $5.00. Coming back to the builder checks it again. The Personalization product must cost $0.00, so its row only says “Set “Personalization” to $0.00 in Squarespace.” |
| ✗ Sold out in Squarespace | Set its stock to Unlimited in Squarespace. |
| ! No details form | It needs the OptionKit details form. Show me how under the row has the steps (part 3). |
| Password protected | Your site has a password. Open your site while logged in to Squarespace, then press Check now. |
3. Add a form to Personalization
Squarespace only saves what customers type if the product has a form. This part stays by hand whichever way you created the products, because neither the import nor Squarespace’s connection can add a form. The part says, in grey: “OptionKit uses the product you created called “Personalization” and its form to record your customers’ choices and text on each order. Without the form, products with these options can’t be added to the cart.” Then: “In Products ↗, select the three dots ⋯ beside Personalization and choose Edit.” and these steps, which Show me how shows with pictures:
- Scroll to Forms. Under Add to Cart Form, select Add.
- If you see Connect Existing Form, select Create New Form in the bottom-left corner. If you’re taken straight to Create Add to Cart Form, continue below.
- In Form Name, enter OptionKit details.
- Delete all the fields Squarespace added, including Name, Email, Phone, and Message. Select the three dots ⋯ beside each field and choose Delete.
- Select + and add a Text Area field. Set its Label to Details. This should be the only field in the form.
- Select Apply in the bottom-right corner, then save the product.
- Return to OptionKit and select Check now.
Come back to the builder: once the form is found, the part folds to ✓ Form added and step 3 is marked done. Connecting or importing never finishes step 3 on its own. A grey reminder stays under the row: Keep “Personalization” priced at $0. Don’t delete it or remove its form.
Changing a product’s URL by hand
The import gives each product the URL OptionKit looks for. If you change one in Squarespace, go to Marketing › SEO and URL › Edit on the product. Squarespace shows /add-ons/p/ and then a box. Type the URL into the box, then scroll to the bottom of that panel and select Apply (Save alone doesn’t keep the new URL). Then save the product.
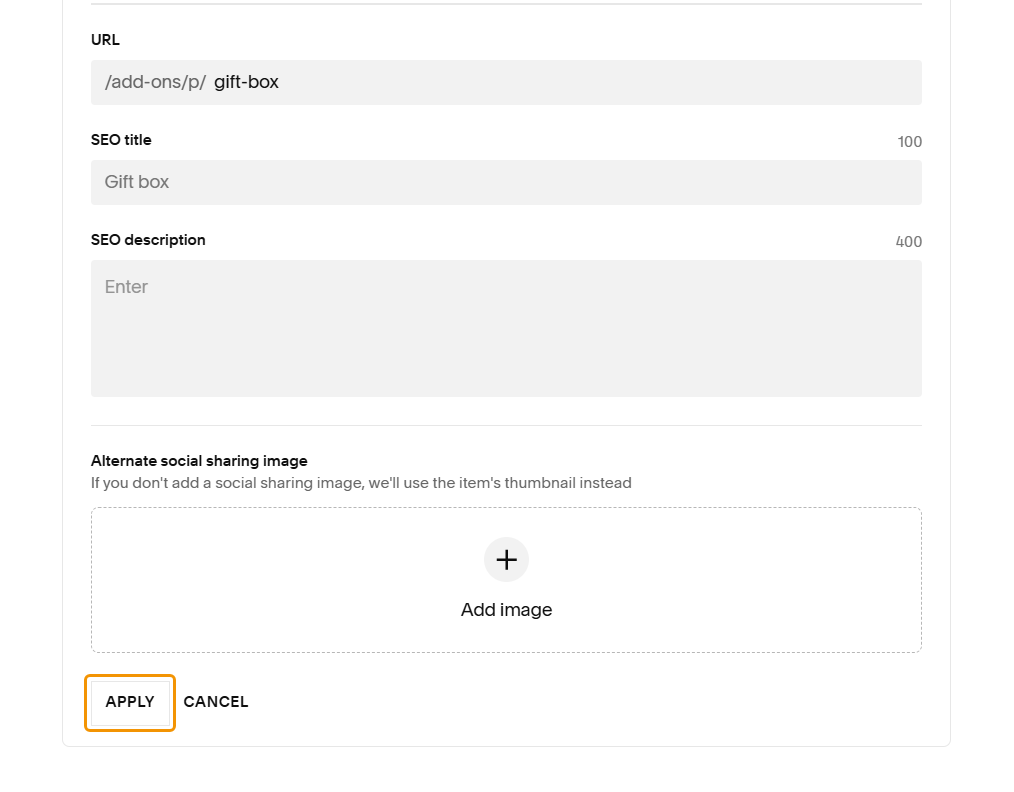
If the URL ends up different, Check my storeThe full check that everything on your store is set up right, without leaving the builder. Its button is in step 1 of the Setup guide when OptionKit hasn’t loaded on your site yet. still finds the product by its name.
Questions
Will customers see these products in my shop?
Not in your menu or in search, as long as the Add-ons page is under Not Linked and hidden from search results. In the page’s settings, open SEO and turn on Hide page from search results. Its products then stay out of search engines too. Someone with the direct link could open one. That’s fine. If someone buys one on its own, without the product it belongs to, OptionKit takes it out of the cart before they pay.
Should I set these products to Hidden in Squarespace?
No. Squarespace won’t sell a hidden product, so a hidden paid option can’t be charged. Keep them visible. What keeps them out of the way is the Add-ons page being out of your menu.
Why unlimited stock?
Each of these products is bought once for each option chosen. If it ran out, that option would show as sold out on every product.
What if I change a price or a name later?
Connected with Squarespace, change it in the builder and select Update: it changes the price in Squarespace too. Set up manually, change it in Squarespace and in the builder. Then select Update. Squarespace charges the price set on the product, so View all says ! Price doesn’t match when the two prices differ, and asks which is right. A name can change freely: OptionKit remembers each product by Squarespace’s own number for it, and the address stays.
Can OptionKit create these for me?
Yes. In step 3, under Create automatically · Recommended, select Connect with Squarespace and allow JuiceKit. OptionKit then creates them and keeps their prices up to date: see Create option products. The form on Personalization stays by hand.